Wood Pallet Makeover
When I saw this wood pallet makeover that my friend Jessi (and her husband) did I immediately asked her to share how she did it with us. Check it out!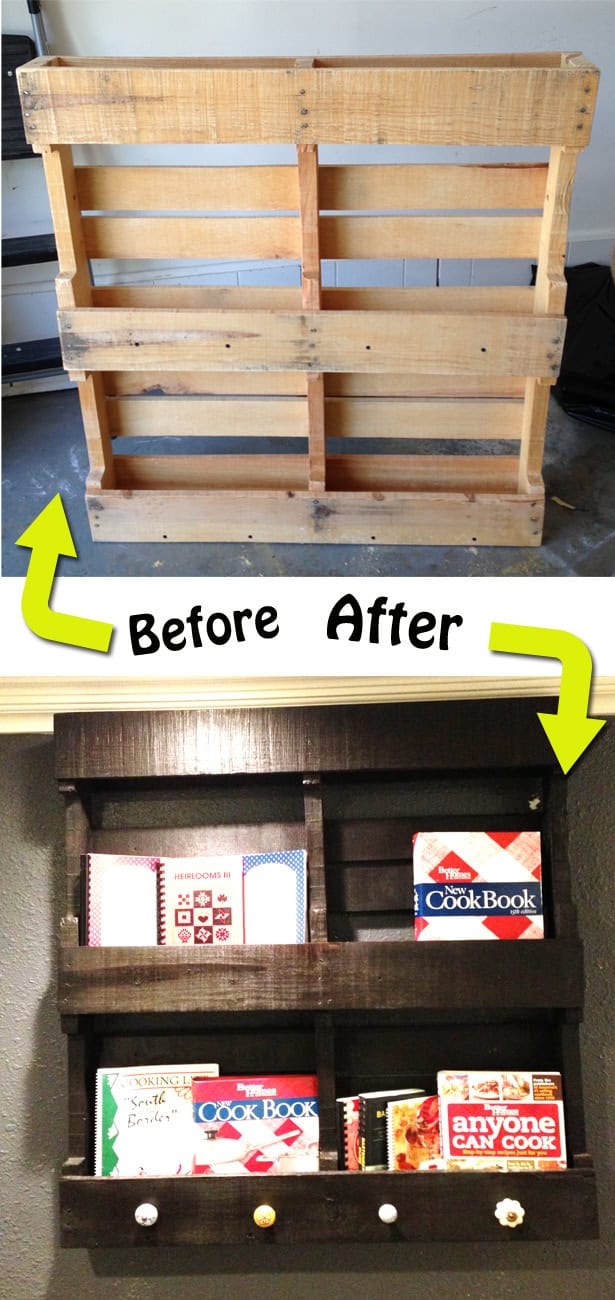
I asked Jessi to share how they did this transformation. Take it away, Jessi!
Ever since my church used pallets for a stage design in the Spring, I was itching to do some sort of pallet project.

After browsing on Pinterest for some inspiration, I decided I wanted to use a pallet for some sort of storage/display for my cookbooks, as well as to hang my aprons on (I love all things kitchen – aprons, cookbooks, kitchen appliances…everything!). Thanks to a friend who had a connection on where I could get a pallet, I was able to get my hands on a pallet for FREE, which then sat in our garage for 3 months while I continually bugged my husband to help me get started on it. Finally, he agreed to help.
Here’s how we did it…
- We first sanded the entire pallet to get rid of any rough spots and also made sure all of the nails were hammered in fully.
- In order to have shelving to be able to display cookbooks we needed to add wood to the middle and bottom level of the pallet, so we bought a 2×4 from Lowe’s and cut it into four 16 in pieces (the length of wood needed may differ from pallet to pallet). My husband hammered each 16in piece of wood snug into it’s place, and then secured them with screws.
- The next step was to stain the pallet. I chose a dark stain because we had some left over from a previous project. One coat of stain was enough.
- After letting the stain dry for 4-6 hours, I added one coat of polyurethane and let it dry overnight.
- I knew I wanted to be able to hang my aprons from the bottom rung of the pallet, so I bought random knobs from Hobby Lobby. Hobby Lobby has a great selection of decorative knobs to choose from that range from $3-5 and they’re usually 50% off, so they’re my go to when it comes to all things knobs. We drilled holes for the knobs and then screwed them into place. I chose to use decorative, fun knobs to bring more color to the pallet, and to bring in other colors I have in my kitchen.
- After adding the knobs, the only thing left to do was to hang the pallet in place! (See details and our challenge below.)
This last step turned out to be the most difficult part. My husband and I have quickly learned that we can never complete a project without something going wrong and up until this point things had been going oddly well…
Unfortunately, the wall we were wanting to hang our pallet on has no studs in it (which we finally figured out after searching for studs for 20ish minutes). The pallet was too heavy for the wall to be able to hold it on it’s own, so we ended up buying some dry wall anchors from Lowe’s that could hold up to 79lbs (my husband wanted to be 100% sure that the pallet would not fall). We used eight anchors and screws to secure the pallet onto the wall (probably way too many, but again, my husband was very particular about it being secure).
That’s it! Finished pallet! I finally have somewhere to display my mother-in-law’s family cookbooks and others I have gathered over the years, along with my many aprons!
Thanks for sharing, Jessi! It turned out absolutely AMAZING.
What size pallet did you use?
I assume it was the standard size.
Heat treated palletts A R E safe and there are too many credible sources of information out there to choose one. Yes, heat treated is important and one will find stamps or other indicators in order to determine this all available by googling pallett safety etc. Its always so unfortunate that the unrefenced opinions of one uninformed person can easily sour things for others. Always check such “facts” thoroughly before becoming so certain. The fact is any raw wood source can be subject to unsavory exposure. I LOVE palletts, find heat treated easily. I am careful to sand and clean, finish with homemade stains and find many useful projects to enjoy!
Can we please stop recommending pallets for interior projects? They have some of the worst chemicals in them, especially Methyl Bromide. They do not belong in a living space in any way unless they can be verified as safe. Something like this: http://www.instructables.com/id/How-to-determine-if-a-wood-pallet-is-safe-for-use/
Hi Jarrod. Thanks for the awareness. Most people probably don’t realize that the wood in pallets may not be safe. We will stick to keeping them as outdoor projects for the future.
I saw on onehundreddollarsamonth blog that u can find heat treated pallets that r safe to use. She uses them for veg beds. Might be something to look into before giving up on i door pallet projects :).
I too have read about all the horrible chemicals in them so have found Heat Treated pallets for all my projects. They are surprisingly easy to find! Just look for the HT mark on the pallet. Most places that give away pallets don’t know what they have so just go and look.
Thanks for the tip!
A cheaper, and more secure, alternative to hang them on the wall is a French Cleat. Just make sure you get the proper weight bearing for the load.